Onboarding Operations
The Onboarding Operations section details the processes required to successfully set up new client accounts. It includes document verification, system setup, and initial case preparation to ensure clients are ready for dispute processing. This section helps prevent delays, ensures compliance, and creates a smooth transition into active service.
Keywords: onboarding, document verification, ID requirements, portal creation, DisputeFox setup, client intake, onboarding workflow, client setup
- Role Overview
- Process Flowchart
- Onboarding Requirements
- Core Processes
- ORT-Done Tagging Protocol — Marking Onboarding Complete in GHL
- Onboarding Callers — Availability and Hours
- Post-Consultation Onboarding Callback SOP — 10–15 Minute Handoff
Role Overview
This page outlines the full scope of the Onboarding Specialist role — what you're responsible for, what success looks like, and why this position is one of the most impactful on the entire team.
Role Overview — Onboarding Specialist
The Onboarding Specialist is the first human touchpoint in a new client's journey at Crowned Credit. This role is critical — it sets the tone for the entire client relationship and directly impacts retention, satisfaction, and results.
Turn new clients into fully onboarded, engaged participants in the Crowned Credit program — ideally within 7 days of signup. The Onboarding Specialist bridges the gap between "just signed up" and "active in disputes."
Position Details
| Field | Detail |
|---|---|
| Job Title | Onboarding Specialist |
| Department | Onboarding |
| Reports To | Onboarding Team Lead → Operations Manager |
| Primary Location | Philippines (majority) / Nigeria |
| Shift Type | Full-time, shift-based (Eastern hours preferred) |
| Tools Used | GoHighLevel (GHL), Aircall, SmartCredit, DisputeFox |
Core Responsibilities
1. Portal Setup & Access
- Create the client's GHL contact record and sub-account portal within 24 hours of purchase
- Generate and send login credentials via email and SMS
- Troubleshoot any access issues the client experiences
2. SmartCredit Enrollment
- Guide the client through creating their SmartCredit account
- Ensure all three credit bureaus (Equifax, Experian, TransUnion) are pulling correctly
- Pull initial credit report and save to DisputeFox profile
- Note credit score from each bureau at the start date (baseline)
3. Document Collection
- Request and collect required identification:
- Government-issued photo ID (driver's license, passport, state ID)
- Proof of address (utility bill, bank statement — dated within 60 days)
- Signed service agreement / authorization form
- Upload all documents to the client's GHL contact record and DisputeFox profile
- Follow up until all documents are received
4. Orientation Call
- Schedule and conduct the 5-10 minute orientation call after onboarding is complete
- Follow the Orientation Call script
- Set expectations for the credit repair timeline, communication cadence, and client responsibilities
- Answer initial questions and address any anxiety or skepticism
5. Onboarding Call
- This is done on a case to case basis if the client or closer requests it
- Guide the client smoothly through the onboarding process
6. Transition to CSR Team
- Once onboarding is complete (portal + docs + both calls done), mark client as "Onboarding Complete" in GHL pipeline
- Ensure DisputeFox profile is complete and ready for Dispute Team to begin Round 1
Required Skills & Qualities
- Excellent English communication — both written and verbal. Client-facing calls require clear, confident, warm delivery.
- Empathy and patience — many new clients are anxious or skeptical. The Onboarding Specialist must put them at ease quickly.
- Attention to detail — missing a document or a wrong date on a form can delay the dispute process by weeks.
- CRM fluency — must be comfortable navigating GHL, updating pipelines, and logging notes accurately.
- Organization and follow-through — each specialist typically manages 20–40 clients in various stages of onboarding at once.
- Problem-solving mindset — clients will have tech issues, missing documents, and scheduling conflicts. Find solutions, not excuses.
The first 72 hours after a client signs up are the highest-risk period for churn. If a client doesn't hear from us within 24 hours, they start to have doubts. Speed, warmth, and professionalism in those first interactions directly determines whether they stick around for months or cancel after week one. Prioritize new signups above everything else.
Process Flowchart
This page maps the complete onboarding process step by step — from the moment a client pays to the day their first disputes go out — so every Onboarding Specialist knows exactly what to do and when to do it.
Onboarding Process — Complete Flowchart & Timeline
The Onboarding Process flowchart maps every step from client payment to active dispute status. Every Onboarding Specialist and Customer Service representative must know this flow cold — it defines the client's first impression of Crowned Credit.
If a client is not onboarded within 21 days, account becomes qualified for suspension.
Step 1: Verify Documents (DisputeFox)
- Log in to DisputeFox
- Navigate to Documents / POA Section
- Confirm all required documents are uploaded:
- ID
- SSN
- Proof of Address
- Any additional required documents
- Verify document quality:
- Image is clear (not blurry, cut off, or too dark)
- All information is readable (Name, Address, DOB, ID Number)
Important:
- If any document is missing or unclear → DO NOT proceed
- Notify the client to upload clear and complete copies
The first 2 hours after purchase are the highest-risk period for buyer's remorse. Speed and professionalism in this window directly determines whether the client stays or cancels. Never batch new client setup — handle each one immediately.
Step 2: Verify Service Agreement
- Go to the Overview Tab
- Confirm agreement status shows SIGNED
Important:
- If agreement is not signed → DO NOT proceed
- Instruct the client to log in to the portal and complete signing
Step 3: Access Credit Monitoring (SmartCredit)
- Go to the Account Tab in DisputeFox
- Locate the client’s Credit Monitoring credentials
- Log in to SmartCredit using the provided username and password
If login fails:
- Stop the process
- Contact the client to confirm correct credentials
Step 4: Check Credit Report Status (Up-to-Date Check)
- In SmartCredit, click the menu (three lines) in the upper-right corner
- Select Order Reports and Scores
Determine report status:
- If report is 14 days old or less → proceed to Step 6
- If report is 15 days or older → proceed to Step 5
Step 5: Order Updated Report (If Needed)
- Click Order Updated Report and Scores
- If 1 free update is available → proceed with ordering
- If no free update is available:
- Stop the process
- Instruct the client to log in and order the update manually
Step 6: Import Credit Report (DisputeFox)
- In DisputeFox, click New: Import Credit Report (red tab)
- Click Save: Import
Step 7: Assign Account
- Go to the Account Tab
- Set Assigned To as:
- Crowned Credit 4
- Crowned Credit 4
Step 8: Send Onboarding Confirmation (GHL)
- Go to GoHighLevel (GHL)
- Send onboarding completion confirmation to the client
- Ask for their preferred due date for the monthly invoice
Onboarding Complete SMS
Hi, this is [Agent] from Crowned Credit. I’m just calling to let you know that your credit reports have already been forwarded to our Dispute Team.
You can expect updates on your file within about 30–35 days. During this time, you may receive letters from creditors or credit bureaus. You don’t need to respond to them, just upload any letters you receive to your client portal so our Dispute Team can review them for you.
If there are any important updates during the dispute round, one of our Credit Specialists will reach out to you. You may also receive updates through email or SMS.
If you have any questions or concerns, feel free to reach out to us anytime. We're here to help.
Preferred Due Date SMS
We’re setting up your monthly billing date moving forward. What day of the month works best for you to be billed starting next month?
The client is in the "Onboarding Complete" stage in GHL, all documents are uploaded, both calls are logged, DisputeFox profile is complete with the credit report saved, the transition note is written, and the CSR + Dispute Team have both been notified. Don't close out until every single box is checked.
Onboarding Requirements
This page details every document required to onboard a client legally and correctly — including what's acceptable, what's not, and why we can't skip verification before dispute work begins.
Onboarding Requirements — Documents & Verification Guide
All clients must provide valid identification and proof of address before dispute work can begin. Proper document verification is a legal requirement — we cannot send disputes on behalf of a client without verifying who they are.
Credit bureaus require that dispute letters come from the actual consumer. Without verified ID and proof of address, our dispute letters lack legal standing and will be rejected. Do not begin dispute processing for any client whose documents are incomplete. This protects the client AND the company.
Required Documents — Standard List
Every client must provide all three of the following. There are no exceptions to this requirement unless specifically authorized by the Team Lead.
| # | Document Type | Requirement | Notes |
|---|---|---|---|
| 1 | Government-Issued Photo ID | Driver's License (front side only), State ID, or Passport | Must be unexpired. Must show full name clearly. FRONT only — back is not accepted. |
| 2 | Social Security Verification | Social Security Card (preferred), W-2, or 1099 showing full SSN | Must show complete SSN. Social Security Card is preferred. W-2 or 1099 accepted as alternative. |
| 3 | Proof of Address (POA) | Utility bill, bank statement, government letter, lease agreement | Must be dated within 60 days. Must show client's full legal name and current address. |
All submitted documents must meet these standards before being accepted:
- Clear and fully readable — not blurry, cropped, or cut off
- All four corners visible — no folded or hidden edges
- For Driver's License: FRONT side only is required
- For POA: dated within the last 60 days from the date of submission
- File format: JPG, PNG, or PDF — no screenshots of screenshots
Alternative Documents
Use the following alternatives ONLY when the primary required documents are genuinely unavailable. Always try for the primary first.
| Primary Document | Not Available? | Accepted Alternatives |
|---|---|---|
| Driver's License | Client doesn't drive or license is expired |
|
| Social Security Card | Lost, damaged, or unavailable |
|
| Proof of Address | Recently moved or no bills in their name |
|
Special Scenarios
Client Has Recently Moved
- If the client has no bills or documents at their new address yet, request a copy of their signed lease agreement.
- If the address on their photo ID doesn't match their current address, that's fine — use a separate POA document for the current address.
- Always record the client's CURRENT address in DisputeFox, not the address on their ID.
Client Opts Out of POA Submission
- A client may decline to send a POA document.
- In this case, the client must still provide their current address verbally or in writing.
- Notify the Dispute Team — they will generate a POA internally from the address provided.
- Document this exception in the GHL notes: "Client declined POA submission — address confirmed verbally. Dispute Team notified."
Client Has No Supporting Documents at All
- This is rare but happens. Escalate to Team Lead before proceeding.
- As a last resort, a PO Box address may be used — but only with Team Lead approval.
- Do not begin dispute processing until this is resolved.
Client's Name Does Not Match Documents
- If there is a name discrepancy (e.g., nickname on account vs. legal name on ID), always use the legal name from the government ID for DisputeFox and GHL.
Document Upload Procedure
Follow these exact steps every time a document is received:
- Receive document — via email, GHL upload, or SMS photo
- Review quality — check clarity, completeness, date (if applicable), and name match
- Reject if substandard — immediately reply requesting a clearer copy. Never upload blurry or cropped documents.
- Upload to DisputeFox — go to the client's profile → Documents → Upload the document to the corresponding field
Before marking documents as "complete" in GHL, confirm all of the following:
☐ Photo ID received — unexpired, front side, full name visible, all four corners shown
☐ SSN document received — full SSN visible
☐ POA received — dated within 60 days, client's full name and current address shown
☐ All documents uploaded to DisputeFox profile
☐ Credit monitoring working and present in DisputeFox
☐ Signed service agreement on file (separate from ID documents)
Core Processes
This portion will contain the process guides for the Onboarding department.
Portal Creation
This page walks you through the exact steps to create a new client's portal in GoHighLevel — a task that must be completed immediately upon payment and sets the foundation for their entire experience with us.
Portal Creation — Step-by-Step Guide
This guide walks Onboarding Specialists and other members of Customer Service through the complete process of creating a new client's portal in GoHighLevel (GHL). This must be completed within at least 30 minutes of a client's payment being received if it is during business hours.
Portal creation should take approximately 10–15 minutes per client. Complete this task immediately when you receive a new client notification.
Before You Begin
Confirm you have the following information from the client's purchase record:
- ✅ Client's full name
- ✅ Client's email address
- ✅ Client's phone number
- ✅ Plan purchased (Essentials/Accelerated/Momentum)
- ✅ Mark the invoice as paid if it is a web purchase or the payment was made through CashApp or Zelle
- ✅ Add any special instructions the Dispute Team must know in Additional Information on DisputeFox
Step-by-Step: Creating the Client Portal
Step 1 — Verify Payment in GoHighLevel (GHL)
Once you receive a portal creation request from the closer:
- Copy the client’s full name
- Open GHL (GoHighLevel)
- Paste the client’s name into the search bar
- Verify that the payment has been successfully processed
- Confirm the membership type purchased:
- Accelerated
- Essential Membership
- Momentum (6-Month Bundle)
After verification:
-
- Mark the client with a ⭐ (star) on GHL
Step 2 — Open Client in DisputeFox (DF)
- Open DisputeFox (DF)
- Navigate to the Client Tab
- Locate the client under Active Clients
- Click on the client's name
Step 3 — Verify Client Details
- Go to the Account Tab
- Copy the client’s First Name (this will be used for the password)
- Navigate to Client Settings
- Confirm the membership status:
- For English-speaking clients: Essentials (Slow Delete); For Spanish-speaking clients: Essentials (Spanish Slow Delete)
- All clients: Accelerated (Accelerated)
- All clients: Momentum (6-Month Bundle)
If Spanish-Speaking client:
Assign the correct agreement based on the client’s plan:
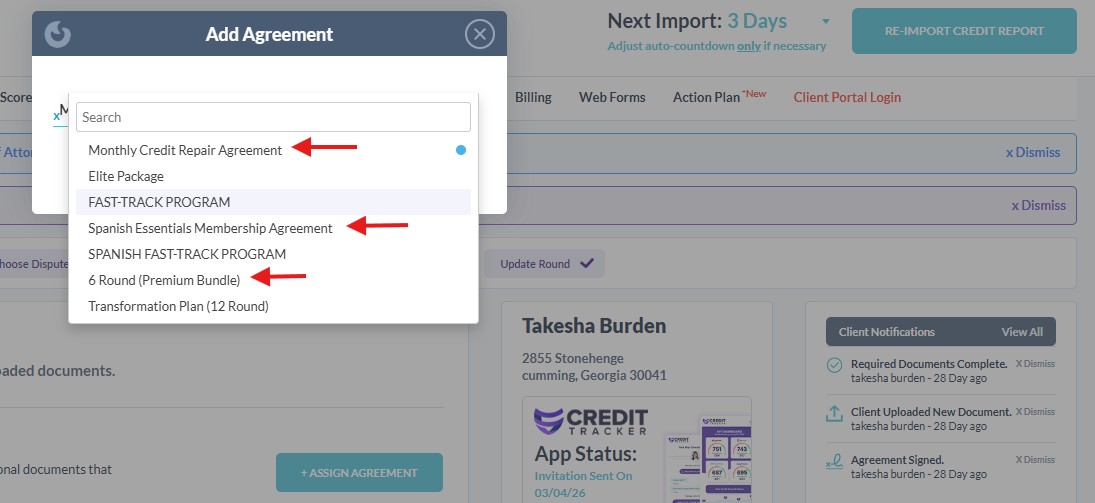
-
- Essential (Slow Delete) → Spanish Essential Membership
- Accelerated → Monthly Credit Repair Agreement
- Momentum → Six Month Premium Bundle
Portal Settings
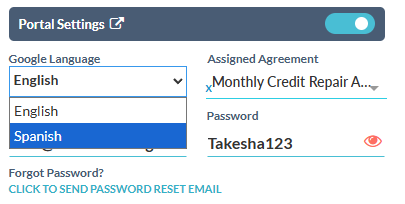
- Go to Portal Settings
- Locate Google Language
- Change language to Spanish
Step 4 — Update SMS Settings
- Locate SMS References
- Click Opt-Out
Step 5 — Update Portal Password
- Go to Portal Settings
- Click the 👁 (eye icon) to view the current password
- Update the password using the following format: FirstName123
- No spaces
- Use only the client’s first name
- Add “123” immediately after
- E.g. Maria →
Maria123
Step 6 — Assign Agent
Step 7 — Send Credit Tracker Invitation
- Scroll to Credit Tracker App Status
- Click Send Invitation
- In the pop-up window:
- Click Send or Save & Send
- Click Send or Save & Send
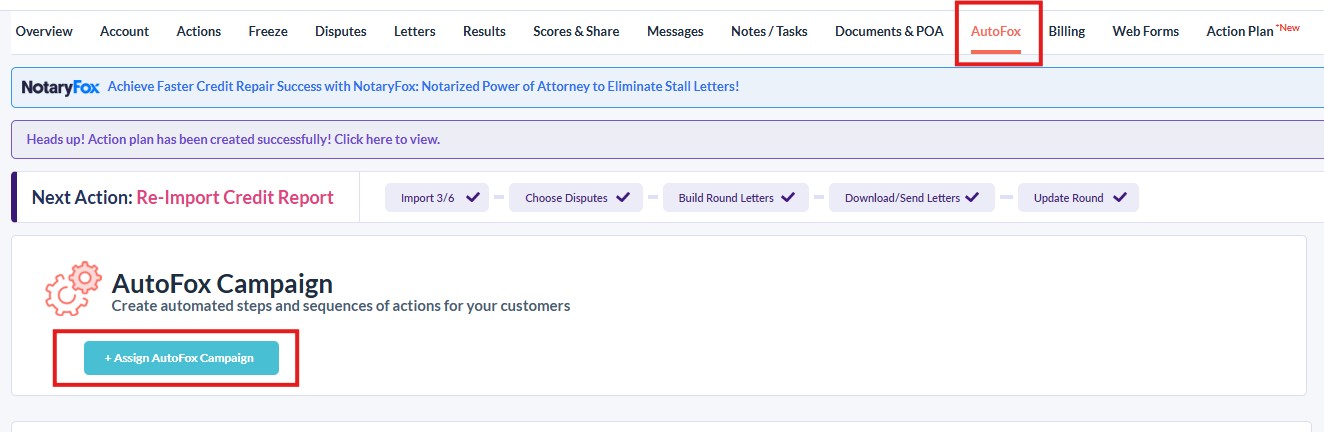
Step 8 — AutoFox Assignment
- Click on AutoFox
- Click Send or Assign
This will generate and send the client’s login credentials.
⚠️ Important — Double check if the onboarding email is reflected by viewing the conversation with the client on GHL
Step 9 — Send Portal Creation Message (GHL)

- Return to GHL
- Send the prepared portal creation snippet to the client
If Spanish-Speaking client:
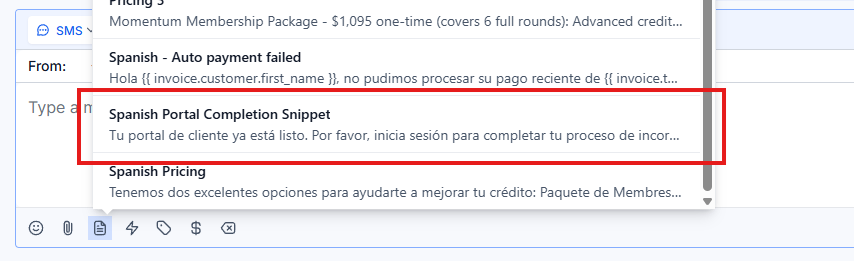
- Return to GHL
- Send the prepared Spanish portal creation snippet to the client
Step 10 — Update Closer (Discord)
- Open Discord
- Reply to the closer’s request
- Send: Done
Orientation Call
This page gives you the full script, checklist, and goals for the Orientation Call — which should be done after onboarding has been completed. This sets the tone for the program and manages expectations early on.
Orientation Call — Script & Checklist
The Orientation Call is the time where we can set client expectations early on to avoid any misconceptions about the process, as well as provide some key reminders to make sure the process goes smoothly. Keep it warm, confident, and energizing.
Duration: 5-10 minutes
Goal: Welcome the client, set expectations, build trust, and provide all reminders
Tone: Warm, professional, confident — like a trusted advisor, not a call center agent
Tools Open: GHL (contact record), SmartCredit (ready but not yet reviewing)
Pre-Call Checklist
Complete these tasks before dialing:
| Task | Done? |
|---|---|
| Confirm if onboarding has been completed | ☐ |
| Review the client's GHL contact record — know their name, plan, signup date | ☐ |
| Have the call script open and ready | ☐ |
| Aircall is set to "Unavailable" if you are making an outbound call | ☐ |
Call Script
Opening
Hi {{contact.first_name}}, this is [Agent] from Crowned Credit — just wanted to do a quick orientation after your onboarding and make sure everything is clear on your end. So as of now, your credit reports have already been forwarded to our Dispute Team, and you’re enrolled in the [Essentials/Accelerated/Momentum] Plan at [$99 per month/$199 per month/a one time fee of $1095].
Your plan is billed monthly [except for Momentum], and it also includes our 90-day refund policy in the event that no major negative items are removed within that timeframe. In terms of timeline, you can expect your first set of results within about 30 to 35 days, since that’s the standard investigation period with the credit bureaus.
Client Responsibilities
“While we’re working on your file, there are a few important things on your end:
-
Keep an eye out for messages in the portal from our dispute team
-
If you receive any letters from creditors or the bureaus, don’t respond to them — just upload them to your client portal so our team can review
-
Make sure to keep your credit monitoring subscription active so we can continue accessing your reports
-
Avoid making payments on any collections or charge-offs that are currently being disputed
-
But continue making on-time payments on any active accounts you have.”
Normalize Fluctuations
“Also, just a heads up — your credit score may fluctuate during the process, and that’s completely normal while disputes are ongoing.”
Where Updates Happen
“All updates will be posted in your client portal on a monthly basis, so that will be your main place to track progress. We also send a progress report through email.”
Support + Accessibility
If anything important comes up on your file, one of our Case Specialists will reach out to you directly. And of course, if you ever need anything, you can always give us a call at 336-310-0090 — we’re here to help.
Closing
That’s everything on my end — do you have any questions for me right now, or anything you’d like me to clarify? [If none,] Thank you for your time, and have a good rest of your day.
ort-done tag to the client's GHL contact record. This tag stops the onboarding automation from sending reminders to clients who have already completed onboarding and orientation. If you skip this step, the client will receive confusing "complete your onboarding" messages — this causes unnecessary support tickets and a bad client experience.
Post-Call Checklist
| Task | Done? |
|---|---|
| Update pipeline stage to "Orientation Call Complete" | ☐ |
| Add the "ort-done" tag to the client's GHL contact — This tag tells GHL the orientation is complete and prevents onboarding reminder automations from re-firing. Without this tag, clients will keep receiving "complete your onboarding" messages even after they are fully onboarded. | ☐ |
| Relay any additional concerns to the appropriate agent if there are any | ☐ |
| If the client did not pick up and it went to voicemail, send them the orientation SMS instead | ☐ |
Orientation SMS Template
Hi {{contact.first_name}}, this is [Agent] from Crowned Credit-Onboarding. I just wanted to give you a quick recap on your onboarding.
Your credit reports have been successfully submitted to our Dispute Team, and you’re enrolled in the (Essentials/Accelerated/Momentum Plan) for ($99/$199)/month. [End at Momentum Plan for clients on Momentum.]
Your plan is billed monthly and it includes a 90-day refund policy if no major negative items are removed. Most clients begin to see initial results within 30–35 days.
While we’re working on your file, please keep the following in mind:
• Check your client portal regularly for updates and messages from our Dispute Team
• Keep your credit monitoring subscription active
• Upload any letters you receive to your portal (no need to respond to them)
• Avoid making payments on collections or charge-offs that are being disputed
• Continue making on-time payments on your active accountsPlease note that your credit score may fluctuate during the process this is completely normal. Updates will be posted in your client portal on a monthly basis.
If anything important comes up, one of our Case Specialists will reach out to you. You can also contact us anytime at 336-310-0090 if you need assistance.
We’re excited to work with you and help you reach your credit goals!
[Agent]
Crowned Credit – Onboarding
ORT-Done Tagging Protocol — Marking Onboarding Complete in GHL
Why this page exists: Clients were not being tagged properly after onboarding completion, causing the system to show incorrect pipeline status. This is a mandatory step.
What Is the "ort-done" Tag?
The ort-done tag in GoHighLevel indicates that a client's onboarding process has been fully completed. This tag:
- Removes the client from onboarding automation sequences
- Updates their pipeline status correctly
- Ensures they don't receive duplicate onboarding messages
- Allows accurate reporting on onboarding completion rates
When to Add the Tag
Add the ort-done tag immediately after completing all onboarding steps for a client:
- ✅ Welcome call completed
- ✅ Client information verified
- ✅ Credit reports pulled and reviewed
- ✅ Dispute strategy explained to client
- ✅ First round of disputes prepared or sent
- ✅ Client understands next steps and timeline
Do NOT wait — tag the client as soon as step 6 is done.
How to Add the Tag
- Open the client's contact in GoHighLevel
- Go to the Tags section
- Type
ort-doneand select it - Save the contact
⚠️ The system will NOT auto-update. You must manually add this tag.
Who Is Responsible?
The onboarding specialist who completes the final onboarding step is responsible for adding the ort-done tag. This is not optional.
Team leads should verify tagging compliance weekly.
What Happens If You Don't Tag?
- Client stays in onboarding pipeline incorrectly
- They may receive duplicate onboarding messages
- Pipeline reports show inaccurate numbers
- Other team members waste time re-checking completed clients
Page created: 2026-04-17 — Based on team directive in #improvement-requests from Sam (Apr 13, 2026)
Onboarding Callers — Availability and Hours
Overview
This page answers a recurring team question: what hours are our onboarding callers available? Use this as the single reference when a CSR, closer, or client asks about onboarding-call scheduling windows.
Standard Onboarding Caller Hours
Onboarding callers are staffed to cover the full client-facing business window:
- Hours: 9:00 AM – 6:00 PM ET
- Days: Monday through Friday
- Coverage expectation: No client should wait more than the Day 0 two-hour window for first contact during these hours.
Weekend coverage is not scheduled by default. Day-0 payments that land on Saturday or Sunday are handled first thing Monday morning and must still close the 2-hour first-contact window from the start of the Monday shift.
How the Team Is Staffed Across Timezones
The onboarding team is distributed and shifts align to US Eastern. Use this table when scheduling handoffs or asking "is someone on right now?"
| Location | Local Shift | Covers ET Window |
|---|---|---|
| Philippines | 9:00 PM – 6:00 AM PHT (night shift) | 9:00 AM – 6:00 PM ET |
| Nigeria | 2:00 PM – 11:00 PM WAT | 9:00 AM – 6:00 PM ET |
| Colombia | 8:00 AM – 5:00 PM COT | 9:00 AM – 6:00 PM ET |
| Dominican Republic | 9:00 AM – 6:00 PM AST | 9:00 AM – 6:00 PM ET |
The highest-overlap collaboration window across all locations is 9:00 AM – 12:00 PM ET. Schedule cross-team handoffs, training, and escalations in this window when possible.
Peak vs. Off-Peak Windows
- Peak (fastest pickup): 10:00 AM – 2:00 PM ET. Full team online, both hemispheres overlapping.
- Steady: 2:00 PM – 6:00 PM ET. Solid coverage, slightly tighter queues.
- Off-peak: Before 9:00 AM ET and after 6:00 PM ET. Calls roll to voicemail; next-shift rep returns them during the Shift-Start "return missed calls" block.
- Closed: Saturday and Sunday — no live onboarding calls.
When a Client Asks "When Can I Talk to Someone?"
Use this exact phrasing so the team stays consistent:
"Our onboarding team is available Monday through Friday, 9 AM to 6 PM Eastern Time. I'll make sure someone from our team reaches out during that window — and if you text us anytime at (336) 310-0090, the next available rep will get right back to you."
When a Teammate Asks in Discord
If someone asks in #customer-support, #ask-questions, or a similar channel "til what time are our onboarding callers available?" — the answer is 9 AM – 6 PM ET, Mon–Fri. Link this page instead of re-explaining.
Exceptions and Escalations
- Holidays: US Federal holidays are rest days for client-facing teams. Philippines/Nigeria/Colombia/DR local public holidays are NOT automatically rest days — team leads maintain coverage.
- Sick / no-show gaps: Team lead redistributes the queue within 30 minutes. No client goes more than 4 hours without coverage during business hours.
- Urgent Day-0 backlog: If a paid client has not been contacted within 2 hours, escalate to the Onboarding team lead immediately.
Related Pages
- Day 0-30 Onboarding Process
- Team Structure Overview (shift coverage strategy)
- Company Policies (attendance & availability)
- ORT-Done Tagging Protocol — Marking Onboarding Complete in GHL
Last updated: April 2026 | Owner: Onboarding Team Lead | Source of truth for onboarding caller availability.
Post-Consultation Onboarding Callback SOP — 10–15 Minute Handoff
Overview
When a client books a consultation and the call wraps successfully (sale closed or services accepted), some clients ask for live onboarding help by phone instead of going straight to the self-serve onboarding flow. This page documents the standard handoff so closers, CSRs, and onboarding callers all use the same words and the same timing.
📌 Created from #customer-support, April 24, 2026 — Heinz Aldana documented the live use of this SOP after wrapping a call with Natalie Lehmann who requested a callback for onboarding assistance.
The SOP — Closer / CSR Side
After the consultation/sale call ends, if the client requests onboarding help via phone:
- Confirm the request on the call. Repeat back: "Got it — you'd like one of our onboarding specialists to walk you through setup over the phone, correct?"
- Set the expectation: 10–15 minutes. Say exactly: "An onboarding specialist will call you in the next 10 to 15 minutes."
- Post in
#customer-supporttagging the onboarding role with:- Client full name
- That you just wrapped the call
- That the client requested onboarding assistance via call
- End with a thank-you to the team
- Do not promise email-only onboarding when the client asked for a call. The phone callback is the commitment.
Example post (use this format)
@Onboarding Team — just wrapped up my call with [Client Name], she would like onboarding assistance via call as well. As per the new SOP, I advised her that an onboarding specialist would call her in the next 10–15 minutes 🙌 Thank you!
The SOP — Onboarding Specialist Side
When a callback request lands in #customer-support:
- Claim it fast. Reply "on it" in-thread within 2 minutes so the team knows it's covered and the closer can move on.
- Call the client within the 10–15 minute window the closer promised. The clock starts at the closer's post, not when you read it.
- If you can't make the window, immediately tag another onboarding specialist who can. Do not let the window slip silently.
- After the call, post "all good" (or a brief outcome note) in the same
#customer-supportthread. This closes the loop and signals to the closer that the client was served. - Tag completion in GHL per the ORT-Done Tagging Protocol.
Timing Rules
| Step | Owner | Window |
|---|---|---|
| Closer posts handoff | Closer | Immediately after call wraps |
| Specialist claims | Onboarding | Within 2 minutes |
| Specialist calls client | Onboarding | 10–15 minutes from closer's post |
| Specialist posts "all good" | Onboarding | Right after the call wraps |
If the client doesn't pick up:
- First miss: wait 5 minutes, call again.
- Second miss: SMS via GHL with the standard onboarding text, log the attempts, post outcome in
#customer-support. - Do not consider the handoff closed until the SMS goes out or the call connects.
Why This Exists
Before this SOP, closers sometimes told clients "someone will reach out" with no time window, and onboarding callbacks could lag 1–4 hours. That created:
- Clients calling back into Aircall confused about who was supposed to call them
- Closers being asked for status mid-shift, breaking their pipeline focus
- Unclear ownership between closer, CSR, and onboarding teams
The 10–15 minute window plus a single Discord post plus an "on it" claim eliminates all three problems. Stick to the script.
When NOT to Use This Flow
- Self-serve clients. If the client says "I'll do the portal myself," skip the callback request and follow the Day 0–30 Onboarding Process automated flow.
- Active-client re-onboards. Existing clients re-engaging are routed to the CSR team, not onboarding. See the AI Booking Agent — Appointment Reassignment page for the active-client routing rule.
- Outside business hours. Onboarding is staffed Mon–Fri 9 AM – 6 PM ET (Onboarding Callers — Availability and Hours). For after-hours requests, log in
#customer-supportand the next-shift specialist returns the call at start of shift.
Related Pages
- Onboarding Callers — Availability and Hours
- Day 0–30 Onboarding Process
- Client Onboarding Communication Scripts
- ORT-Done Tagging Protocol
- AI Booking Agent — Appointment Reassignment & Missing Closer Records
- Speed-to-Call Protocol
Created 2026-04-24 from live #customer-support handoff (Heinz Aldana / Natalie Lehmann). SOP source: customer-support channel observed practice, April 2026.